Friday 18 May 2007

Make Your Router Xbox Live Compatible

NAT

Have you ever unsuccessfully tried to find a friend’s game on Xbox Live even though you knew it was there? Have you ever been unable to join a friend’s XBL game when he sent you an invite? Have you ever been in a pregame lobby and been unable to hear the voice communications of other players? I think we’ve all experienced problems like the ones above. They are frustrating to encounter and even more frustrating to troubleshoot. However, most problems of this nature can be traced to NAT (Network Address Translation). Read on to find the solution.

What is NAT? From a helpful page on xbox.com:

When multiple devices share a single Internet connection (a PC and an Xbox 360â„¢ system, for instance), the networked devices typically rely on Network Address Translation (NAT) to prevent information traffic jams.

Routers with different NAT settings don’t like to talk to each other. Think of this like high school cliques. The most snobbish NAT setting is “strict.” Routers with this setting are like Abercrombie and Fitch models. In addition to being unusually thin, they are extremely discerning in whom they talk to, and when a router with a NAT setting of “open” asks to connect, it’ll probably get rejected. The “open” NAT setting is the most forgiving. Think of routers with this setting like a bus station skank. Yeah, it may catch a disease once in a while, but it sees a lot of action. It doesn’t reject anybody, and besides its monthly trip to the clinic for free profilactics it’s always available for online gaming. Somewhere in the middle is the NAT setting of “moderate.” Routers with this setting are like the kids that live at Hot Topic. These routers are very mysterious and often grow up to produce indie punk rock into their early thirties. Nobody really knows what’s going on inside the “moderate” setting. It’s more strict than “open” and it’s more open than “strict.” Exactly what level of noncompliance trips the switch to “moderate” is anybody’s guess. Here’s a handy chart of what NAT settings can talk to each other.

NAT

The bottom line is that if your network uses a router the following is probably true:
1. It needs to use NAT.
2. NAT may cause Xbox Live connectivity problems.
3. You can fix the possible problems by tweaking a few settings.

How do you determine if NAT is the source of the internet gremlins that are stealin’ yer voice packets? One of the easiest ways is to see if your router has been certified by the Xbox team as Xbox Live compatible. This is a free program Microsoft offers to network equipment manufacturers to help them get their equipment XBL compliant. The company sends the Xbox team sample equipment and the Xbox team works with the company to get their router within spec. After it is compliant, the company can sport the “Xbox Live Compatible” logo. See the list of certified Xbox Live compatible routers here. If you are one of the many people who’s router is not on the “officially approved” list, like myself, then read on.

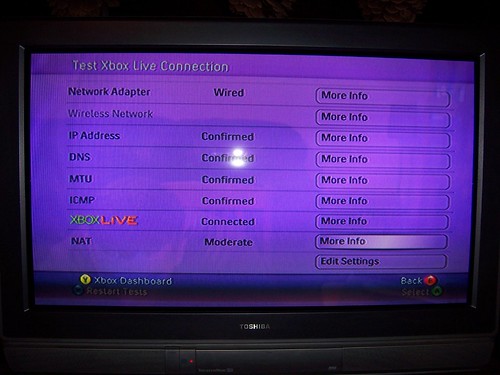
Power on your Xbox 360, boot to the dashboard, and pull up the “network settings” tab. Perform the “Xbox Live Connection Test” and note the last field at the bottom of the screen for “NAT.” If you connect successfully and the NAT value returned is “moderate” or “strict” then it is probably the source of your woes. As you can see below, my router returned a setting of “moderate.”

NAT

Microsoft has a support page to help you with your NAT settings. The prescribed solution is to “open” the following ports on your router:
• UDP 88
• UDP 3074
• TCP 3074

By “open” I mean forward traffic on those ports to your Xbox 360 console. First, you need to find the local IP of your Xbox 360 console. You can get this from the network settings tab in the dashboard. It’s probably 192.168.x.x Now, login to your router’s admin panel. If you’ve never done this, refer to your router’s user manual. It’s not difficult at all. If you’re absolutely too lazy or unable to find the manual, try the following:

1. Type 192.168.1.1 into your browser’s address bar. If that doesn’t bring up your router’s admin panel try 192.168.1.100 or 192.168.2.1
2. When you get the login screen for your router try the following common default user name/ password combinations

UN: admin
PW: admin

UN: admin
PW: blank (I mean literally, leave it blank)

PW only: blank

3. The above attempts are a last ditch effort because you won’t google your router’s model number, so stop complaining that it doesn’t work for you.

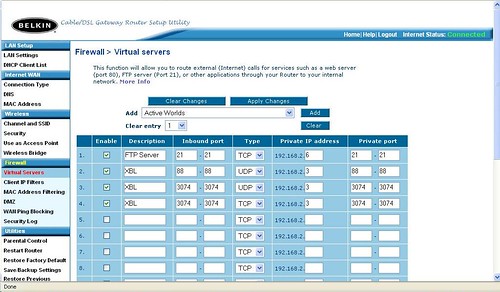
After you get logged in there are a plethora of settings to screw up…err… tweak. You’re looking for a setting that says port forwarding, virtual servers, UPnP forwarding, or something similar. Bottom line is find a screen that looks like the one below, and enter the above settings in addition to your console’s IP address. As you can see, my console’s IP is 192.168.2.3.

NAT

Hit apply, submit, or whatever button is applicable and see if you broke anything. Nothing on fire? Good. Rerun the Xbox Live Connection Test in the dashboard and see if it improved your NAT setting. In my case, my Belkin router has a cool setting called “DMZ” under the firewall settings. It allows me to effectively place one local IP address (device) outside the NAT settings of the rest of the network. It appears to be specifically inserted for situations when the “NAT feature is causing problems with an application such as a game.”

NAT

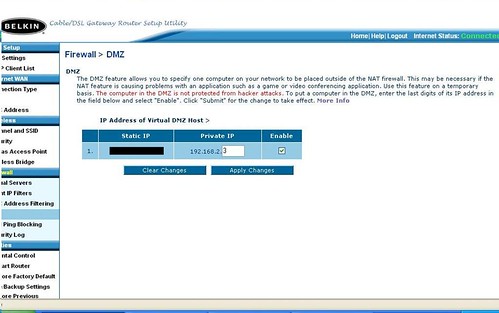
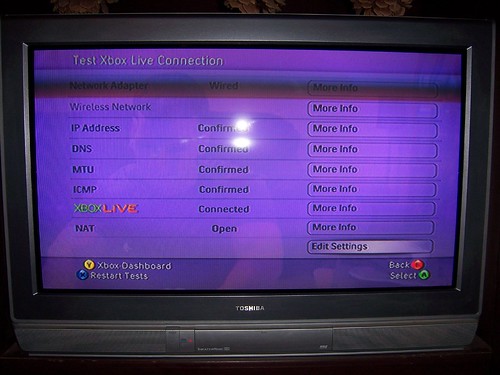
I’m not worried about the risks of someone hacking my Xbox 360, because if they do they’ve made a huge discovery and will be blogging about it at xboxscene.com anyway. I told it to exclude my Xbox 360 from NAT, reran the test, and my NAT setting changed to “open.” Woot!

NAT

These directions won’t work for everyone. Actually, there’s a decent chance that you’ll screw something up during this process and temporarily kill your XBL connectivity or even your internet connection. If you do, just find the hard reset button on your router (this will return the router to default settings) and cut your losses. You also may need to restart some or all of your networking equipment for the new settings to take effect. This is as easy as unplugging the device from AC power and plugging it back in. Networking is a mystical art full of surprises. Dive in, change some settings, and figure out what’s happening inside that Pandora’s Box of packets. There’s nothing you can do that $60 and a trip to Best Buy won’t fix.

Thursday 17 May 2007

Papercraft Star Wars Minifigs

Japanese site Piro model with instructions and templates for creating your own papercraft Star Wars minifigs:

Click the pictures above to go to instruction pages on Piro model. The instructions will be in Japanese, but they’re numbered and easy enough to follow visually.

Here’s what the templates look like:


Digg!

Learn how to make the switch to Linux

ubuntu%20logo.png

Maximum PC shows you how to make the switch to Linux.

Specifically, Ubuntu Linux. This exhaustive article covers every step, from downloading and installing the OS to connecting to your network to actually using Linux. The author covers real-world topics like managing photos and music, configuring your e-mail and even setting up a printer. In short, it's as comprehensive a switch-to-Linux guide as you're likely to find anywhere (though here's another one, just for reference). Interestingly, the article itself is open-source: Maximum PC has released it with a Creative Commons attrib-sharealike license, so anyone can download, share and modify it.

Install Linux apps on your Mac


The Simplehelp weblog has a great step-by-step tutorial for running Linux apps on your Mac using the free, open source programs Fink and FinkCommander.

It's a many-step process, but guide is very detailed, so it's a pretty easy set up. Once you've finished, you can install and run any of a number of great Linux apps (actually, it's technically UNIX apps that run on Linux). The guide gets an extra gold star for the Quicksilver addendum at the end describing how to add the new apps to your Quicksilver catalog. You're not going to be able to run any Linux app under the sun with Fink,

Install Ubuntu Studio - Linux for the creative set


Install Ubuntu Studio - Linux for the creative set

ubuntu-studio.png

Web site HowtoForge details how to install Ubuntu Studio, an Ubuntu flavor aimed at the creative set.

If you're interested in audio, graphics, and video editing but you don't have the scratch to shell out for the premium Windows or Mac apps, Ubuntu Studio could be a great time to take the dive into Linux. HowtoForge's installation instructions are straightforward and simple, so you should be able to get things up and running without too much effort (its Linux so if you have only ever used windows prepare for a few bumps).

Writeroom (Mac OS X )

For Mac users who enjoy the simplicity of a typewriter, but live in the digital world. WriteRoom is a full-screen, distraction-free writing environment. Unlike the cluttered word processors you're used to, WriteRoom is just about you and your text. Requires Mac OS X 10.4 or later.

A place to sit down and write

Walk into WriteRoom, and watch the distractions fade away. Now it's just you and your text. It's a place where your mind clears and your work gets done. When your writing is complete, exit WriteRoom and re-enter the busy world.

Overcome the challenge of the digital life

With so much e-mail and information pouring in, the digital life we lead can sure be a blur. If you've found it getting harder to focus on the words you want to write, if you've forgotten how great it feels to really write distraction-free, then let WriteRoom help you rediscover your muse.

Enhance writing in other programs

Using a feature called "Edit in WriteRoom," you can take text out of many compatible programs and bring it into WriteRoom—with a single click or keystroke. When you're finished, close WriteRoom and the text will be updated in the original program. So regardless of what program you're in or what you're typing, you can take your text to WriteRoom and block everything else out until you're done.

Furnish to your liking

Your WriteRoom can stay green-on-black, or you can choose your own colors, fonts, and page layout. Scale up your text for easy reading. Show the scroll bar all the time, or only when you need it. Even features like spell-checking and rulers are there if you want them.

Is WriteRoom the right tool for you?

WriteRoom shines when you just need to write, but if you are looking for a programmer's text editor or tool to help manage your writing projects then there are better choices. If you need syntax highlighting and command line integration try TextMate, a nice hard core text editor. If you need to manage a large multifaceted writing project try Scrivener, and see what its many cool features have to offer. But if you just need to sit down, think, and write, then we think WriteRoom is an excellent choice

You can download the demo from http://www.hogbaysoftware.com/product/writeroom

Run Mac OS X on a PC

People have long wanted to run the Mac OS operating system on PC hardware, specifically on Intel and AMD architectures. But despite pleas and prayers, that wish remains unfulfilled.

Although running Mac OS natively on PC hardware is not possible, there is another option--running Mac OS X on an emulator. In this article, I will show you how to install and run Mac OS X Panther on your PC using PearPC, a free, architecture-independent PowerPC platform that runs on PCs. To check out PearPC's features, go to the PearPC-PowerPC Architecture Emulator web site.

Here are the steps you'll take to use PearPC to install Mac OS X:

  1. Download the PearPC PowerPC Architecture Emulator.
  2. Obtain hard disk images for use with PearPC.
  3. Obtain images of your client OS installation disk.
  4. Configure PearPC to use the hard disk image and the OS images.

Downloading PearPC

Download the PearPC PowerPC Architecture Emulator. Once it's downloaded, extract its content to a folder, say, [Desktop]:\PearPC. This is the folder that is going to contain all of the files you'll see in the next couple of sections.

Note: [Desktop] refers to the path of my Windows desktop; that is, C:\Documents and Settings\BinaryPirate\Desktop\.

Hard disk images

To install Mac OS X on the emulator, you need a hard disk image. You can download preformatted hard disk images from http://pearpc.net/downloads.php. Two disk sizes are available: 3GB and 6GB. If you plan to install the full Mac OS X, then use the 6GB image. If you have limited disk space on your hard drive, use the smaller, 3GB image. Be aware that the default install of Mac OS X takes up a little more than 3GB, and so you need to unselect certain components during installation if you use the 3GB image.

The disk images come in two formats: BZ2 and RAR. I used the 6GB RAR disk images. You need to uncompress the disk image before you can use it. To uncompress the RAR image, I used WinRAR from http://www.rarlab.com/download.htm. Uncompress the image and save it in the [Desktop]:\PearPC folder.

Making images of your client OS

To install Mac OS X on your hard disk image, you need to make copies of your Mac OS X installation disk in ISO format. You can use Nero or any other disk utility to save CDs or DVDs in ISO format. In my case, I have saved the images in the C:\PearPC folder. I have named the first disk Panther1.iso.

Note: You need to purchase Mac OS X in order to run Mac OS X in PearPC.

Configuring PearPC

Once you've taken the previous steps, you're ready for the final step: configuring PearPC to use the all the relevant disk images. To do it, you need to create a configuration file. You can find the instructions on how to create one manually at http://pearpc.net/guides.php?guides_id=2. Or you can download a Windows application that does all the hard work for you. In my case, I used the PearPC Control Panel to help me manage my Mac OS X emulation.

Launch PearPC Control Panel and click on the Create New Configuration File icon. You will see the first screen as shown in Figure 1. Click on Continue to proceed to the next step.

Figure 1
Figure 1. Using the Create Configuration File wizard

In the next screen, you have to supply a few pieces of information (see Figure 2). First, specify the location of the PearPC emulator. In my case, it is [Desktop]:\PearPC\ppc.exe.

Next, specify the location of the hard disk image; that is, [Desktop]:\PearPC\macosx_6gb.img.

Note: Be sure to replace [Desktop] with your own desktop path.

Also, set the amount of memory you want to set aside for Mac OS X. (I have allocated 255MB.) Click on Continue.

Figure 2
Figure 2. Creating a new configuration file

In the next screen, you have the option to specify the screen resolution and color depth to use. Click on Finish when done (see Figure 3).

Note: I tried to enable networking, but I never got it to work. Also, use G3 and not G4 CPU emulation.

Figure 3
Figure 3. Specifying additional options

Give a name to the configuration file and save the file in the location specified (see Figure 4). Name it Mac OS X Panther and save it in the location [Desktop]:\PearPC\macosxpanther.cfg. Click on Finish.

Figure 4
Figure 4. Completing the wizard

You should now see the icon for your Mac OS X Panther in the PearPC Control Panel (see Figure 5). You need to complete one final step before you start installing Mac OS X on your PC--check the "CD-ROM device is installed" option and specify the location of the Mac OS install disk image. In my case, it is [Desktop]:\Panther1.iso. This is the image that will be used to boot up the emulator.

Figure 5
Figure 5. The completed configuration file

Figure 6 shows the files in my [Desktop]:\PearPC folder. The important files are highlighted.

Figure 6
Figure 6. Files in the PearPC folder

That's it! Double-click on the Mac OS X Panther icon and you should see the PearPC 0.3.0 window pop up (see Figure 7). Your Mac OS X installation should start soon afterward.

Note: It took me quite a while to get my Mac OS X to install. I encountered a number of failed attempts--when I booted into Mac OS X, it prompted me to restart my machine. But after several attempts, it worked.

Figure 7
Figure 7. Installing Mac OS X

Once the OS is installed, you will be asked to restart the machine. For subsequent attempts to run Mac OS X on your emulator, you should uncheck the "CD-ROM device is installed" option so that it can boot directly from the hard disk image. If the installation is performed correctly, you should see something like Figure 8 when Mac OS X boots up.

Figure 8
Figure 8. Mac OS X booting up

Figure 9 shows I am having fun with my newly installed Mac on my PC.

Figure 9
Figure 9. Running Mac OS X on a PC!

And if you still doubt if I am really running Mac OS X on my PC, Figure 10 will prove it to you.

Figure 10
Figure 10. Running Mac OS X in my Windows XP PC

Summary

Before installing PearPC and using Mac OS X, you need to keep several things in mind:

  1. You need a license to run Mac OS X. That is, you need to buy a copy of Mac OS X.
  2. The installation process takes time. Don't install Mac OS X on a slow machine; I tried the steps outlined in this article on three different machines--933MHz, 1.7GHz, and 3.0GHz, all equipped with 512MB of RAM. The 3.0GHz machine installed significantly faster compared with the rest, but it still took me several hours to get all of the installation done. Also, make sure you have lots of free hard disk space. The hard disk image itself takes up 6GB, and the additional installation disk images are going to take up a few more gigabytes.
  3. Even though the installation process is painfully slow, once the system is installed it is actually quite responsive. While you won't be able to fully experience Mac OS X as if you were using a real Mac, the emulation provides a good way for you to try out Mac OS X before you head to the nearest Apple shop to get the latest iMac.